Working with Sage Exchange Desktop
Right-click the icon in the Microsoft Windows System Tray to access the Sage Exchange Desktop shortcut menu, where you can control the functions detailed below.
Checking the version and for updates
Right-click the icon then select if you want to see which version of Sage Exchange Desktop is installed on a workstation.
Sage Exchange Desktop is a self-updating application, where the service will automatically check (via the Internet) for updates periodically and prompt you to install them if found. You can also manually check for updates by right-clicking the icon in the Microsoft Windows system tray then selecting .
Turning Sage Exchange Desktop Off or On
By default, Sage Exchange Desktop always runs as a service in the Microsoft Windows system tray after installation. Right-click the icon then select if you want to stop the Sage Exchange Desktop service and disable online credit card processing for the current user on the workstation. In Microsoft Windows, select to start Sage Exchange Desktop and to enable online credit card processing on the workstation.
Note: If multiple users install (and use) Sage Exchange Desktop on a workstation, you must log on then turn off/on Sage Exchange Desktop for each user to completely disable/enable online credit card processing on the workstation.
Restarting Sage Exchange Desktop
If you need to restart Sage Exchange Desktop (for example, if you are having problems processing credit card payments), right-click the icon then select .
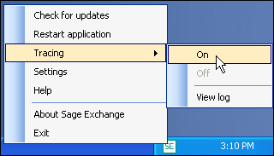
Enabling tracing
Right-click the icon then select to enable tracing, where Sage Exchange Desktop writes technical details about each process to a log file, spsnet.log. The log file does not contain credit card data. On average, there is no need to enable this function unless requested by our Technical Support team. The submenu also allows you to disable tracing () and to open the log file in Microsoft Windows Notepad (). After enabling tracing, you must restart Sage Exchange Desktop to apply the setting.
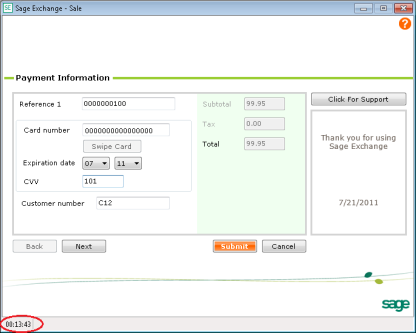
Understanding the Sage Exchange Desktop timeout setting
In compliance with Payment Application - Data Security Standard (PA-DSS), the bottom left-hand corner of the Sage Exchange Desktop window displays a 15-minute countdown timer. The Sage Exchange Desktop window closes automatically when the timer reaches zero; regardless of whether or not you have entered data. Sage Exchange Desktop does not retain the data so if the window closes, you must re-enter the data. You cannot disable the timer or change the timeout duration.